Friday, April 12, 2013

Trail Volunteer Day


Want to give back to the community, work in a beautiful national park, and get those hiking boots dirty? Join other Davis locals and Outdoor Davis staff by helping repair, maintain and enhance trails, and protect sensitive natural habitat in the Golden Gate National Parks!


Outdoor Davis will be volunteering with the Golden Gate National Park Service Trail Crew from 9:00am to 12:00pm on Saturday May 11th doing trail restoration work on the Dias Ridge Trail in the beautiful Marin Headlands. Together, our stewardship will help create and maintain a world-class trail system for our community to enjoy today and in the years to come. Come on out and join us for a day of fun!

General Work Overview: (http://www.parksconservancy.org/assets/get-involved/pdfs/waiver-forms/volunteer-work-description.pdf

What to Wear:
Wear comfortable work clothes, long pants, and sturdy shoes or boots (no shorts or sandals).
Dress in layers for changing weather, bring hat, and wear sunscreen.
Be prepared to get dirty.

What to Bring:
Bring completed waivers (You can pick one up at the shop or print one out from the link below and drop it off at the shop)
Bring a reusable water bottle. We’ll have water stations for refills.
All necessary tools, supplies, gloves and training will be provided. If you have a pair of favorite gloves, feel free to bring those

Waiver: http://www.parksconservancy.org/assets/get-involved/pdfs/waiver-forms/volunteer-waiver.pdf

***It is important that you:
1. RSVP with us by sending us an email at outdoordavisblog@gmail.com or by dropping by the store.
2. Fill out a waiver and drop it off with us at the store.

Project Site: Dias Ridge, Marin

Meeting Location: Muir Beach Parking Lot (directions below)

Google Map to Muir Beach: https://maps.google.com/maps/ms?hl=en&ie=UTF8&oe=UTF8&msa=0&msid=215435246737961154464.0004b30bf8f9d35ca288b&ll=37.860557%2C-122.571888&spn=0.006412%2C0.010504&t=h&z=17&vpsrc=6&iwloc=0004b311f28bedd9ae25c


From Davis:
Take I-80 W towards San Francisco

Take exit 33B to merge onto CA-37 W toward Novato/San Rafael

Take the exit onto US-101 S toward San Rafael/San Francisco

Proceed south on Highway 101 to the Highway 1/Stinson Beach/Muir Woods exit.

Exit at the Highway 1 exit.

Proceed on HIGHWAY 1 (Shoreline Hwy) West for ~5½ miles to the community of Muir Beach.

From there on, follow all the signs to Stinson Beach.

As Highway 1 levels out at Muir Beach, look for the Pelican Inn & the Muir Beach sign on your left.

Turn left on Pacific Way at the Pelican Inn. 

Follow Pacific Way ~1/4 mile to Muir Beach

Park in the Muir Beach parking lot and look for the group near the picnic area.

.................................................................................

If you have any further questions about the event, email us at outdoordavisblog@gmail.com

Monday, September 10, 2012

Jake in Peru 2

Jake is back with us, but we wanted to give you his last update from Peru!


Hola amigos. It's been quite a while since I've had any time to sit down and write, so I've got a lot of new experiences to mention. I hope that some of you will be relieved to hear hat I am indeed still alive.

I returned to Cusco after Machu Picchu and had a day's rest there before I headed out for another 5 days of trekking to Ausangate. At near 6,400 meters, it stands as the tallest mountain in the region and is pretty much visible from wherever you happen to be in Cusco. Our hiking there was less strenuous in terms of sheer elevation change per day than the time in Salkantay, but our average elevation was a bit higher. We reached just over 5,200 meters, another milestone for me, huzzah! Along the way we got to see some gigantic glaciers and frozen waterfalls as well. UNREAL. 


Back to the actual trekking though. Ausangate is also home to alpaca, llama, and sheep herding communities. It's a pretty amazing experience to get to interact with these pastoralist families and see the way they live. There traditional dress consists of extremely colorful dyed wool or alpaca fiber, perfectly suited to the harsh sun and wind of the Andes. They live in tiny remote huts along the vegetationless ridges and possess very little aside from their herds of animals, whose wool they shear and sell to earn their income. They seem to have a sixth sense as well, or atleast a "gringo sense." It was like they could smell us from miles away. As soon as we'd begin to near a village or home, children would suddenly appear by our sides, seemingly arising out of hills. They were happy to take pictures with us, show us their animals, and offer us some handicrafts. The kids made off with a pretty good haul though, we gave them more cookies, candy, and coins than they could carry. On the last day of our trek we passed through a small village and had a chance to soak our sore legs in some hot springs before heading back again to Cusco.


Two days of R&R in the city and we were back on the road, albeit having lost one of our travel buddies, Joe. He headed back to the US without us, meaning we've been reduced from 4 mosqueteros to 3. We packed up our stuff and headed to Arequipa. The architecture and city style there is much more Spanish colonial than Cusco. It lies down between three incredible volcanoes. From Arequipa, we made our way down to Chivay at the edge of Colca Canyon. The canyon is absolutely stunning, and with a depth 4,160 meters it's nearly twice as deep the grand canyon. The bed of the canyon is cut through by the Colca river and the walls are flanked by high Andean ridges. We stayed at hospedaje in this little village as a base camp to seeing the canyon and made a day trip out to "Cruz del Condor." It's the perfect spot to sit at the edge of the canyon and observe Andean Condors out for their morning pass through the canyon. Most of these gigantic birds had wingspans nearing 10 feet and we had quite a spot to watch as they glided right by us, like watching feathered jumbo jets. We took a public bus back from the canyon that day, quite an egregious error in judgment on our part. I counted 45 seats on the bus when we got on, none of which were open for the 2 hour ride over unpaved road. In South America, you'll quickly discover that the term "safety regulation" very rarely applies to, well...anything. To our dismay, the bus continued to make all it's regular stops along the way and at my final count I noted close to 100 people on the bus. Quite a cramped, uncomfortable 2 hours of standing as we were thrown around while the bus charged over speed bumps and tight corners.

After the canyon, we hopped on a 5 hour bus to Puno, which lies on the Peru side of Lake Titicaca. From Puno, we took another 3.5 hour bus to cross the Peru-Bolivia border. Where we had the privilege of paying the Bolivian "reciprocity fee" for the crime of being American. We were told to bring a myriad of documents (proof of economic visage, yellow fever vaccination, itinerary for leaving the country, hotel reservations), but in the end all that was required was the dinero. An hour later and we were into Bolivia, albeit $140 less wealthy.

The next morning, we again traveled by bus and 4 hours later we were in La Paz, the highest gobiernatorial capital city in the world. Along the way, our bus was forced to stop for numerous parades, as natives clad in traditional dress of all sorts lined the streets of each subsequent village. La Paz is gigantic and rather hectic, it's the first true metropolis I've stayed in on my trip. Skyscrapers litter the  vast expanse of city and the pink houses creep high up the steep walls of the canyon where the city lies. We are staying, again, at a Wild Rover Hostel, only 2 blocks from Plaza Murillo, the government capital and home of President Evo Morales.

We took an ATV trip out to explore the Valle de la Luna, where we saw some pretty unique rock formations and views of the city from the crescent-shaped crater ridge. While passing through villages, we were constantly chased down by packs of stray dogs, who must really enjoy the sound of ATVs for whatever reason.
The real fun began yesterday though, when we headed to the Camino de Muerto, the world's most dangerous road, for some mountain biking. The view as we approached the road was breathtaking. To get an idea of how steep the journey is, let me give you some stats. We descended from the Andean Mountains at 4,600 meters down to the Bolivian Amazon near just over 1,100 meters over 64 kilometers of distance. That's 11,500 feet of drop in just under 40 miles for you Americans. INSANE. The road is about 10 feet wide, flanked on one side by steep rock face and on the other by sheer cliff drops of hundreds of meters. Despite efforts to reduce traffic and improve the road, our guide informed us that there are still an average of 200 deaths per year on the Yungas Road. We saw resounding proof of this at our first photo stop, where the guide pointed out the wreckage of the most recent accident. A couple hundred feet below, we gazed at the crumpled remains of what I assume must have, at one point, been a car. You wouldn't have believed a car could explode into that many pieces though. Anyways, sufficiently scared, we continued our journey downwards and that's when the fun began. When I get going fast, I get a little...excited. And I may have neglected safety at some points in the pursuit of having some fun. To be blunt, I fell...three times. The first was a simple spin out, as I approached the edge waaayyy too fast and hit both brakes, I whirled around twice to find myself facing uphill 3 feet from the edge. Strike 1. The second came as we got into the more narrow part of our ride. Packed in tight with the other riders in narrow space, I emerged from a thick cloud of dust to find, to my surprise, that I had missed a turn and was heading straight into the rock wall. I slammed into it face first and thanked God for my full face helmet, otherwise I'd be tallying up my third broken nose. As tends to be the case with slow learners, my third crash was the worst. I again took a curve going beyond the velocity limit of both my bike and my ability. As my wheels became more squirrely on the loose gravel and I looked ahead, I came to a horrifying, HORRIFYING realization. I was going over the edge, no ifs ands or buts about it. I did the only thing I could do, threw myself to the ground and kicked the bike out from under me, no doubt to perilously fall 1,000 meters down into a steep oblivion. Right? Eh maybe not. As I picked myself up and dusted off, I looked over the edge to find...my bike, about 15 feet down in a ravine. My friends came along a couple moments later to find me, bike hoisted overhead, trying to climb my way out. Luckily, they only laughed for a few moments before helping me. We had come down low enough that we were only 2 turns from the bottom, I had survived the world's most dangerous road. Woohooo. Although I had torn threw my protective rented canvas pants on my last fall and my left hip is covered in bruises, I'm pretty happy with the result. We cleaned off at the bottom with some swimming and a much needed lunch. Back to La Paz a couple hours later and now enjoying the city again.

Paz amigos.

Sunday, August 12, 2012

Vasque Breeze GTX Review


Vasque Breeze GTX Review

I'm pretty minimalist when it comes to footwear. Since I bought my first pair of Vibram FiveFingers all those years ago, I've never really envisioned myself hiking in anything else. However, sometimes circumstances call for an alternative method. So for backpacking and high mountain trekking I needed to choose a real hiking boot. Being someone that doesn't like a ton of shoe, it was important that my boots be lightweight. At a sweet 1160 grams, the Breeze is just what I was looking for. Supportive, sturdy, durable, but also not gonna weigh me down a ton. It was also important that I have boots for any condition, rain or shine. With a breathable waterproof Goretex layer, the Breeze checked another requirement off my list. Ok so that's what the manufacturer says about them, but how do they really hold up?
I took my Breezeys out for a two-day backpacking excursion in Desolation Wilderness up near Tahoe. I was carrying around 40 pounds in my pack. I bought some extra moleskin for the inevitable blisters that come with breaking in new boots while carrying more weight than you should. Didn't happen. For a durable hiking boot, the Breeze are remarkably box-ready to be worn. They felt a little bit stiff in the upper for the first few days. However, in terms of the support and shank of the shoe, I never expected them to be so comfortable right off the bat. I hiked about 30 miles in my first week with them and had absolutely no issues.
Then it was off to South America. Surely the Andes mountains would provide a tougher test for these boots. For 8 days and for over 40 miles of rigorous up and downhill in every imaginable condition, they held up to everything Peru could throw at them. I hiked through ankle high mud, slush, rivers, and snow. These Vasque boots kept my feet dry the whole time, even when I fully submerged my feet for a waterproofing test. The Vibram tread has some pretty no-nonsense lugs on it as well, providing great traction. The only times that I slipped were on packed ice/snow and when coming out of the water with wet treads onto slippery granite, both of these are typical no matter what type of boot you happen to be wearing. Also, the boots live up to their namesake in that they keep it Breezey. Mesh paneling makes them REALLY breathable. I wore my Darn Tough wool hiking socks the whole time, a great match for any hiking boot, and never worried about overheating. Merino wool is awesome for a hiking soft. Aside from being super soft and plush, the wool is a natural temperature regulating fiber. It retains warmth incredibly well, even if it happens to get wet, but is breathable enough to still feel cool even if scorching heat. In the case of sweat or water leaking into a shoe, the wool quickly wicks moisture away from the skin keeping you dry. Merino wool also contains lanolin, which is antibacterial. I'll be honest, I switched off between 2 pairs of Darn Tough wool socks depending on the day, and in MY humble opinion they never really even started to smell. On top of that, Darn Tough has a LIFETIME warranty on their products. Which means, as long as you take care not to lose or somehow destroy your socks beyond normal wear and tear, Darn Tough is perfectly willing to support their product and send you new ones if they reach their limit.  I find it to be a pretty good indication of a good boot and sock combo when you can really forget about, well, the fact that you're wearing a boot. The Breeze are light and breathable enough to accomplish this.
Pros:
Lightweight and breathable
Goretex waterproof layer holds up to the test
Supportive with a strong and wide base platform
Cons:
Lots of mesh paneling and stitching rather than a one piece upper, for many boots this just means more areas that could fail to function eventually
Sizing note: I normally wear a size 11 shoe. For the Breeze, I went up to an 11.5 and they fit PERFECTLY. Be aware you may have to go up in size a bit in these boots. 
Review by Jake

Wednesday, August 1, 2012

Jake in Peru!


Ok Amigos,
I've been in Peru now  for 17 days and my first time in South America has been unreal. I spent the first week in Cuzco, the historical capital of the Inca Empire. The city is a good mix of tourists and locals. Of course the best food is to be found at the local market, where my friends and I seem to be the only gringos brave enough to venture for cheap comida. But hey, we eat a lot and the teeny expensive portions at the local tourist restaurants don't really cut it, so we've been heading off to the San Pedro Mercado for heaping plates of Lomo Saltado.  The hostels here offer a great chance to meet other travelers and make new friends, everybody's open minded and willing to share recommendations on what the best thing to do is at each of their recently visited destinations. Of course, a local ATM chose to not return to me my debit card upon a withdrawal. Luckily, I'm traveling with friends kind enough to lend me some funds until I find another means of getting some cash.

For the last 8 days, we've been off in the mountains having the time of our lives. We took the Llama route to Salkantay all the way to Machu Picchu. For the first four days we had some pretty grueling hikes, going for 6-7 hours and summiting multiple passes per day, some as high as 4,900 meters. Which brings me to another talking point, altitude. I've never stayed anywhere before above 3,000 meters. I came to Peru in great shape thinking all that stuff about altitude sickness was just for old ladies to worry about. I was wrong. Altitude sickness is real, my friends, and it's lurking at about 3,400 meters to make a giant idiot out of you. I found doing routine things, like climbing a flight of stairs or ROLLING UP A SLEEPING BAG, to be on par going out for an easy 10 mile run in lead boots. But there's a reason we're hiking up so high and that is the views. I've never seen anything like the Andes mountains, nothing that even compares to it. The Andes jut straight out of the ground and climb steeply up for thousands of meters to jagged, snow-capped peaks. I love California landscape, but the Andes make the Sierras look like mole hills. Even my beloved Yosemite pales in comparison to the terrain here, flying from Lima to Cusco during the sunrise blew my mind. The ENTIRE country is mountains.  Also, the stars at night are insane. I've never seen the constellations of the Southern Hemisphere. At night, at 4,600 meters, in the mountains with no light pollution for 50 miles, I could go into a trance laying down and staring at them up here.

Yesterday, we made it to Machu Picchu after resting for the night at Aguas Calientes. I've never been so happy to have a shower and bed to sleep in, I'm fairly sure us four dudes smelled worse than any stray dog you could find in all of Peru as we walked into town. Machu Picchu was, of course, crazy. An entire city of ancient ruins sprawled across a tiny little platform, hidden away high up between the mountains.

Other things I've experienced so far in Peru:

Chicha, a traditional Peruvian beer made from corn, is actually pretty decent. I've had it at a few restaurants and even elected to have some when we went to watch the local soccer team, Cienciano, last week. If you come to Peru, don't order it at a soccer game unless you want to feel like somebody's been beating you over the head with a wiffle ball bat two hours later. It comes in a plastic bag fit for a goldfish and looked anything but sanitary.

Sopa de Cabeza. Yep. Sheep's head soup is pretty popular in the more local spots here and you even get to choose which part of the head you want in your soup. Oh Yeah! I ordered tongue last week. No joke, they literally put the entire sheep's skull, meat still attached, into the bowl with the soup. La lengua was pretty good actually, tender meat. I also had some ojo, sheep's eye, and it was tasty as well. One just has to get over the American-ness of being a picky eater and realize it's all meat anyway. And yes, I had my first huevo, or cooked ram's testicle this week as well. I apologize to those of you who just dry heaved, but it wasn't as bad as you might think.

Anyways, I've got a lot more stuff to talk about but that will have to do for now. More updates and pictures soon as I head South.

Sunday, June 10, 2012

Need Gift ideas for the Dads and Grads in your life?


Prana's motto is "born from experience". Well, if I was to make this review as short as I can I would use one short sentence: Prana stands by their motto, and delivers great products. Although I enjoyed every Prana product I've used, their pants and shorts are my favorites. Prana found a way to balance look, comfort, durability and functionality in each and every pants/shorts I own (10 pairs of Prana pants and shorts, I'm a Pranaholic). Let's start.

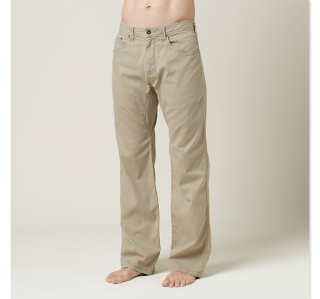
The Bronson pants

WOW. That's all I could think for the first few minutes wearing these pants. Although they are made for climbing and hiking, no one will spot that at a nice dinner party. The fabric blend of cotton and spandex provide the great feel of cotton, and in addition provide enough stretch for functionality. You will not be able to use the Bronsons as an excuse for not being a good climber, so you better work on your skills. The added micro sanded canvas will resist abrasion, and promise you'll enjoy them for many years. The Bronson pants are one rugged pair of pants. Besides using them for climbing and hiking, I found myself wearing these a lot as my everyday pants for school or work. For those of you who don't like to wear pants during the hot summer days of Davis, Prana now has the Bronson shorts. If you are the person who finds himself leaving work and looking for an adventure, look no further. The transition between the office and the outdoors was never smoother.

The Stretch Zion shorts

The holy land of technical shorts. Made mainly from nylon (97%), the Stretch Zion shorts are durable, breathable, quick drying and extra ventilated. They are light weight, and great if you are short on space when traveling. This one pair of shorts could be used for hiking, climbing and even yard work. I've never felt over-heated wearing the Zion shorts. After wearing them, almost any other pair of shorts feels about as breathable as rubber boots. The Stretch Zion also comes in a pant and a convertible style, so you can have the same comfort and functionality all year long. The convertible version cuts over the knees, just like the shorts. It makes the zipper almost unnoticeable. The adjustable waist belt allows the adventurer to find the best fit, always. They never feel too loose, or too tight, just right.  The Stretch Zion is the short/pant/convertible for your next adventure.

The Mojo shorts

Comfort, comfort, comfort. The Mojos are so comfortable. You'll be a 100% satisfied with those 100% polyester shorts. Yoga, Pilates, climbing or grilling in your back yard, the Mojos will deliver. The Mojos are super light, breathable and quick drying, so you'll always feel great. The elastic Waist belt feels awesome, fits like nothing else, yet feels secure even in the most obscure position you can imagine. They are so great I have three pairs of those shorts. The mesh pockets are deep enough to hold your phone, wallet and keys securely, yet don't add any bulk. You, just like me, will find yourself looking for them the second you step into your home after a long day of work. Heck, I work at Outdoor Davis, so I wear them to work!

 Long story short. Prana pants and shorts fit to a T.  Try them! You'll like them!

Review written by Outdoor Davis assistant manager, Arik

We can't forget our outdoor-loving ladies for this review! Below are a few of Leia's favorite women's items.


prAna Kaley Tunic Top
This is by far my favorite outdoor top! I have it in 3 colors.  I too, am a prAnaholic.  The built in bra top is snug enough that I don't need to wear an additional bra with it.  You have to love that on hot Summer Davis days! 

One complaint I often have with outdoor clothing is that the tops are skin tight. Not the Kaley Tunic Top! It's tight on top and flowing at the bottom.  Also, since it's a tunic length, it's a bit longer than most prAna tops.  I absolutely love this feature. The fabric was so stretchy and comfortable that I actually wore this top until I was 7 months pregnant without my belly hanging out the bottom! I've also been wearing while losing the baby weight.  It has been with me through all my fabulous body changes and looks great at every stage.  I get tons of compliments every time I wear it.

I've worn it for everyday, hiking and traveling and love it for every use.

Pros: 
Super cute
Super flattering 
Fits over a pregnant belly (yay!)
Supportive top
Doesn't show every lump and bump

Cons:
Fabric started to pill a bit (LOTS OF USE)

My only con is that my top no longer looks new.  It still looks really nice, but the fabric has worn a bit.  I chalk it up to wearing it twice a week through my entire pregnancy, a lot before and a lot after.  It was worn and washed a lot and I'm still wearing it!

Overall, I recommend this top highly.  It fits MANY body types and looks cute with a skirt, jeans or shorts. I LOVE IT!

Patagonia Margot Dress

Not only am I a prAnaholic, but I am also a dressaholic.  Anyone who knows me will tell you that.  This is just one of the many in my closet. :)  Patagonia dresses are by far my favorite out of all the "Outdoor-chic" dresses you can get now-a-days. Every style I have fits like a glove, and the margot dress is no exception.  The straps are wide enough that you can wear a supportive bra without it showing, but you can also get away with just wearing a little cami under.  The ruching at the waist adds some details to an otherwise simple dress and the fabric patterns always have me coming back again and again.

It's made with super soft organic cotton and looks very flattering on.  The Patagonia description lists it as a "slim-fit", but I've found that it just skims the body a bit, without being tight.  I'm no bean-pole and this fits me great.  My mom tells me I have an "athletic build"... Thanks mom... 

I have seen quite a few women with different body styles try on this dress.  I haven't seen one person that it isn't flattering on.

Pros:
organic cotton
flattering
interesting patterns
hides a supportive bra

Cons:
no built in bra

I approve. 

Women's review written by Leia

Thursday, May 10, 2012


Kelty TC 3.0 Child Carrier

The TC 3.0 Carrier by Kelty. The sleek lines and small frame of the TC 3.0 make it the ideal carrier for shopping, or hiking with your little one. It is easy to use and comfortable for parents, thanks to the convenient torso length adjustment and molded backpanel. The TC 3.0 comes fully loaded with Kelty's TC Sun Hood, and Kelty's changing pad.
DECENT FEATURES of the Kelty TC 3.0 Carrier
  • Five-point, adjustable child's harness
  • Sun Hood included (US Patent 5,609,279)
  • Changing Pad included
  • Padded, adjustable-height child's seat
  • Toy loops
  • Carry/lift handles
  • Foot stabilizer for safe loading
  • Lightweight internal aluminum frame
  • Sliding waistbelt torso length adjustment
  • Laminated, curved waistbelt
  • Laminated, curved and padded shoulder straps
  • Laminated, padded backpanel
  • Waistbelt storage pockets
  • Scherer Cinch waistbelt system (US Patent 5,465,886)
The SPECS
  • Maximum Load Weight: 40 lbs / 18.1 kg
  • Torso Fit Range: 11 - 16" / 28 - 41 cm
  • Volume: 1450 cubic inches / 23.8 liter
  • Weight: 5 lbs 7 oz / 2.4 kg
  • Dimension (L x W x H): 12" x 12" x 21" / 30 x 30 x 53 cm
  • Fabric: Body: 420D poly ripple, 420D HD poly oxford / brushed nylon
We only have one left in stock! Come in today to check it out for the upcoming hiking season with your little one.  Was $179, but now marked down to $120! 

Monday, April 16, 2012

OPTIMUS CRUX CAMPING STOVE REVIEW

Details (Provided by Optimus)See stove page here

Average boil time for 1 L of water: ~ 3 min/1 l water, depending on climate, altitude etc.
Average burn time: Up to 60 min at maximum output (220 g canister)
Dimensions (cm): 8.4 x 5.7 x 3.1
Dimensions (in): 3.3 x 2.2 x 1.2
Fuel type: Butane/propane gas canister (not included)
Kit includes: Burner with valve and stuff bag
Output (BTU): 10200
Output (W): 3000
Technology: Gas
Weight (grams): 83
Weight (oz): 2.92
Price $49.95

Size/Weight:
Perhaps the biggest feature the Optimus Crux showcases is both its size and weight. Weighing in at only 2.9 ounces and no bigger than a driver’s license when folded for storage, the Crux easily fits and stores underneath the necessary fuel canister with the help an included elastic pouch. Storing the Crux in this manner not only increased the storage space in my pack (although not drastically), but it made it easier to keep my cooking accessories close to one another instead of items possibly being separated within the pack or when unpacking in low-light situations. Aside from being well padded, the carry pouch appears to be sturdy and well constructed. (I pulled along the seams when I first removed it from its packaging to test its strength.) I did not notice any defects or possible weaknesses on a weekend hiking/camping trip to Death Valley, CA.

In regards to the weight, the Crux could double in size and still the impact on your pack’s weight would be negligible, if even noticeable. With such a large variety of lightweight camping stoves being produced specifically for backpackers, and having used several of them myself, I believe the weight of the Crux is not nearly as important of a factor as the size.


Functionality:
Like all camping stoves that require the user to use the fuel canister as the base, properly balancing the stove can be a problem. I had more than one cup of water tip off during by trip, but again, this problem isn’t restricted to this particular stove, just my inability to find flat ground, I guess. Throughout the weekend I never experienced any real problem threading the stove to a fuel canister. I used a canister from an opposing manufacturer when finding Optimus canisters became a problem. However, after multiple uses I did notice that the serrated pot supports became much stiffer at the hinges, which made extending them a bit more difficult. While this is often the case with pot supports, the small size of the Crux’s pot supports only made the impeded extension more noticeable, but not really a big hindrance. If a backpacker is seeking to do any medium to large scale cooking while on the trail, then he or she should look elsewhere instead of at stoves the size of the Crux. This stove is mainly for 1-2 people. But for those who are content with heating up the 12 or so ounces of water needed to cook prepackaged backpacker meals, then this stove will easily do the job. Whether boiling water for my meals or cooking some noodles (I’ll withhold the brand, but every college student knows it well), I have always relegated myself to one metal cup over the years. The large burner head on the Crux is more than enough to quickly heat up the 13oz cup in just a few minutes. If someone is inclined to use a bigger pot, well then you can naturally expect a bit longer of a wait.

The large control valve made managing the flame control quite easy, but I did notice than when the heat is lowered to a simmer that even a minor breeze routinely extinguished the flame. This isn’t a problem if it’s being used with a high flame to boil water or food like I was doing, but while I was testing the settings it was a recurring trend and may be an annoyance for someone wanting to keep their food warm. This happens to most small canister stoves that you turn down very low.  If you’re expecting weather, a heat shield can be your best friend and block that pesky wind from blowing out your flame. But let’s face it…On a backpacking trip, the most likely scenario is scarfing down the food when it’s done, not keeping it warm for an hour. 

Having tested and burned a full 8oz fuel canister on the patio before my trip to make sure all worked correctly, my Crux stove burned for nearly 50 minutes. While not the 60 minutes that Optimus advertises, it would all depend on how high or low an individual maintains the flame.

After having used the stove for whatever cooking purpose you saw fit to engage in, packing the stove becomes a matter of patience. Compared to other stoves I have used in the past, the Crux seemed to take longer to cool down after use. While this may not be a problem if you are turning in for the evening and can leave it cool down, it may impede your ability to get everything properly packed in the morning while you wait for it to cool. Can’t I just break down camp while I wait? That’s what I’m usually doing while I’m letting the water boil for breakfast. But if that isn’t you’re method of morning activities, then playing the waiting game may not be an issue.

Because I have not had this particular stove over an extended period of time or used and abused it in a variety of weather conditions I can give you no insight into how it holds up or the maintenance it requires to stay operational. What I can say is that the Crux appears well built, even at the hinges that make it so compact. The one piece that may cause a problem though, is the plastic spring at the hinge that locks the burner head in place. While this could be broken, if transported in the padded fabric case the plastic components are well protected and is covered with a manufacturer warranty for one year if you did have a mishap.  


Pros/Cons Summary:
            Pros:
·  As mentioned previously, the size of the Crux is its biggest draw for several reasons. It helps keep your cooking necessities together as well as saves some space in your pack.
·  The large burner head helps spread out the area the flame heats, decreasing the time it takes to cook or boil water, depending on what environment you’re in of course.
·  For the quality of stove Optimus is providing, the Crux is an amazing find for any minimalist backpacker.
            Cons:
·  The Crux takes a considerable amount of time to cool down after boiling some water. This could be a problem if you are in a rush to pack up and start your day.
·  If the heat is lowered to the point of simmering, any hint of a breeze can blow the flame out on the stove, so it is better to just turn the heat up and get your food cooked as fast as you can or use a weather shield.
·  Balance is always an issue with stoves requiring threaded fuel canisters, and the Crux is no exception.

Overall, it is a piece of gear I would willingly take into the field again, and will.

Review by Outdoor Davis staff, Patrick Graham